Content Editor & Optimizer
The complete guide to writing, editing, and optimizing content in Floyi.
Getting Started
Section titled “Getting Started”The Content Editor is Floyi’s all-in-one workspace for creating, editing, and optimizing content. You can access it by:
- From Topical Authority → Click “Create Draft” on any keyword
- From Content Briefs → Click “Generate Draft” after brief generation
- From Projects → Open any existing article draft
The workspace consists of three main areas:
- Left Panel (collapsed by default): View your content brief
- Center: The rich text editor
- Right Panel: Settings, Optimizer, Images, Research & Quality tabs (resizable — drag the panel edge to adjust width)
Content Editor Overview
Section titled “Content Editor Overview”Workspace Layout
Section titled “Workspace Layout”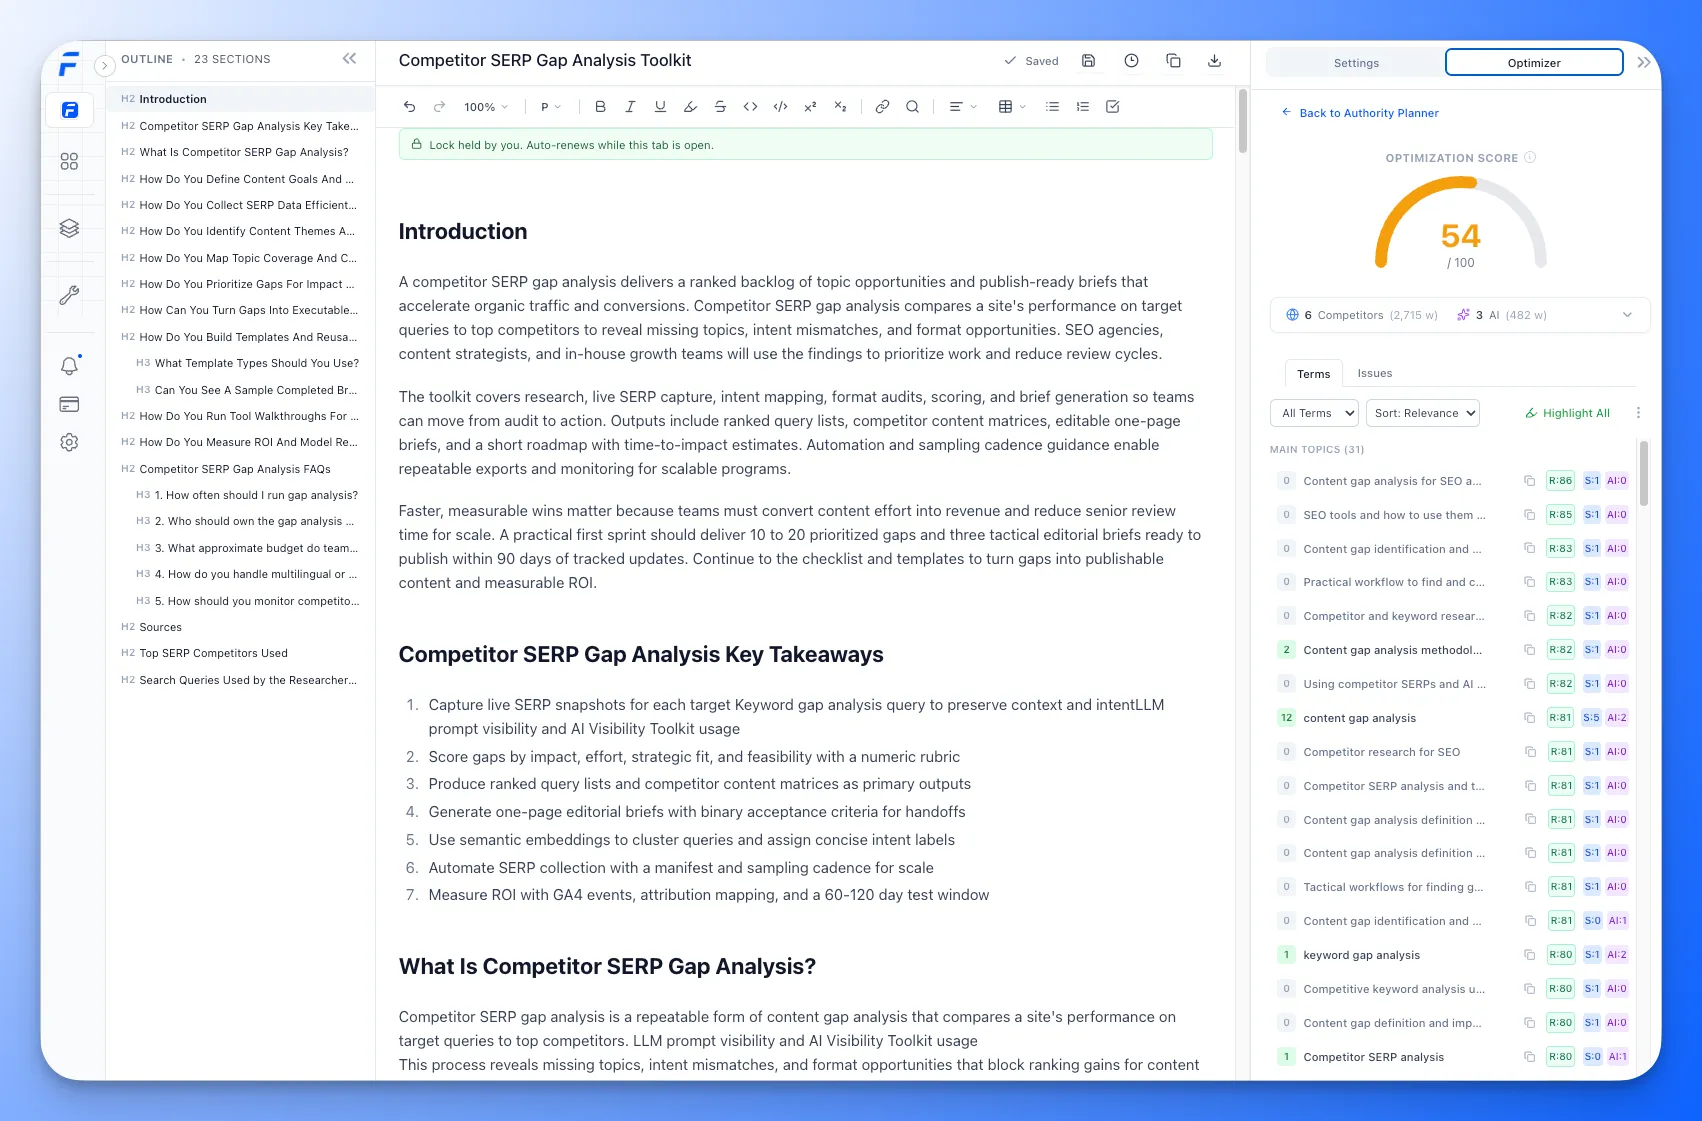
Split Screen Mode
Section titled “Split Screen Mode”Click Split Screen in the header to view your content brief alongside the editor. This helps you:
- Reference brief recommendations while writing
- Check structural suggestions
- Verify term coverage against competitor targets
- Stay aligned with strategic intent
Use the draggable divider to adjust panel widths.
Editor Toolbar
Section titled “Editor Toolbar”The toolbar provides all formatting options for your content.
Text Formatting
Section titled “Text Formatting”| Button | Function | Shortcut |
|---|---|---|
| B | Bold | Cmd + B |
| I | Italic | Cmd + I |
| Underline | Underline text | Cmd + U |
| Strikethrough | Cmd + Shift + S | |
Code | Inline code | Cmd + E |
| Clear | Remove formatting | Cmd + \ |
Block Formatting
Section titled “Block Formatting”| Button | Function |
|---|---|
| Paragraph dropdown | Convert to Paragraph, H2, H3, H4, etc. |
| Bullet List | Create unordered list |
| Numbered List | Create ordered list |
| Task List | Create checkboxes |
| Blockquote | Create quote block |
| Code Block | Create multi-line code |
| Horizontal Rule | Insert divider line |
Alignment
Section titled “Alignment”| Button | Function |
|---|---|
| Left | Align text left |
| Center | Center align |
| Right | Align text right |
| Justify | Justify text |
Links & Media
Section titled “Links & Media”| Button | Function |
|---|---|
| Link | Insert or edit link (opens modal) |
| AI Images | Open the Images tab to generate and insert AI images |
| Table | Insert table |
Link Modal Options
Section titled “Link Modal Options”When inserting a link, you can configure:
- URL - The destination URL
- Link Text - Display text for the link
- Open in new tab - Whether to open externally
- Nofollow - Add rel=“nofollow” attribute
Tables
Section titled “Tables”After inserting a table:
- Click any cell to edit
- Use the table menu to add/remove rows and columns
- Drag to resize columns
- Merge cells for complex layouts
Find & Replace
Section titled “Find & Replace”Click the Search icon or press Cmd + F to open Find:
- Search for text in your content
- Navigate between matches with arrows
- Replace individual or all occurrences
Undo/Redo
Section titled “Undo/Redo”| Button | Function | Shortcut |
|---|---|---|
| Undo | Undo last action | Cmd + Z |
| Redo | Redo last action | Cmd + Shift + Z |
Use the Zoom dropdown (bottom right) to adjust editor zoom level:
- 75%, 90%, 100%, 110%, 125%, 150%
- Helps readability without affecting actual content
AI Writing Assistant
Section titled “AI Writing Assistant”The AI Writing Assistant is your in-editor AI copilot. Select any text and transform it instantly—simplify complex sentences, expand ideas, fix grammar, or give custom instructions.
For a deep dive into all features, see the AI Writing Assistant guide.
How to Use
Section titled “How to Use”- Select text in the editor (up to ~400 words)
- AI bubble appears above your selection
- Choose an action or type custom instructions
- Preview the result before accepting
Available Actions
Section titled “Available Actions”| Action | What It Does |
|---|---|
| Simplify | Makes text clearer and easier to understand |
| Expand | Adds detail, examples, or depth to your selection |
| Shorten | Condenses text while keeping key points |
| Fix Grammar | Corrects grammar, spelling, and punctuation |
| Optimize | Mode to incorporate specific terms from your brief |
| Custom | Your own instructions (e.g., “Make it more persuasive”) |
Preview & Accept
Section titled “Preview & Accept”After the AI generates a result:
- Original tab → See your original text
- Generated tab → Preview the AI’s version (with proper formatting for lists, tables, links)
Actions:
- ✓ Accept → Replaces your selection with the AI version
- ✗ Reject → Keeps your original text, closes the panel
Tips & Best Practices
Section titled “Tips & Best Practices”- Keep selections focused — 1-2 paragraphs work best
- Use Optimize Mode — Click Optimize, then select terms from the right panel to fill gaps
- Use Custom for tone — “Make it sound more confident” or “Use active voice”
- Links are preserved — Any links in your selection stay intact after transformation
- Works with formatting — Lists, bold, italic all render correctly in the preview
Content Settings Panel
Section titled “Content Settings Panel”The right panel has five tabs: Settings, Optimizer, Images, Research, and Quality.
Settings Tab
Section titled “Settings Tab”Article Details
Section titled “Article Details”| Field | Description |
|---|---|
| Title | Your article’s title (auto-populated from brief) |
| Meta Description | SEO meta description for search results |
| Article URL | The target URL/slug for publishing |
| Estimated Word Count | Target word count based on competitor analysis |
Editing the Title & Meta Description
Section titled “Editing the Title & Meta Description”Click Edit next to the title and meta description to open the editor modal. If the brief generated alternate title options, the modal lists them — each labeled by its strategy with a one-line reason — so you can switch to a different option in one click. You can always type your own instead. Changes here update the article only; the brief keeps its own title.
Strategic Intent
Section titled “Strategic Intent”Choose how the AI writes your content:
| Intent | Writing Style | Best For |
|---|---|---|
| Human-First | Warm, conversational, friendly | Blog posts, thought leadership |
| LLM-Friendly | Clear, chunked, citation-ready | SEO content targeting AI search |
| Executive Summary | Concise, scannable, action-oriented | Business audiences, busy readers |
Note: You can only change Strategic Intent before generating your first draft.
Specialist Agents
Section titled “Specialist Agents”After generating an initial draft, you can run Specialist Agents to enhance specific aspects:
| Agent | Function |
|---|---|
| SEO Optimizer | Improves keyword placement and on-page SEO |
| Data Enricher | Adds statistics, studies, and data points |
| Fact Checker | Verifies claims and adds citations |
| Web Researcher | Finds and adds external references |
| Conversion Coach | Adds CTAs and conversion elements |
| Intro & Key Takeaways | Polishes introduction and summary sections |
How to use:
- Select one or more specialists
- (Optional) Add custom instructions
- Click “Run Specialists”
- Review the enhanced content
Custom Prompt
Section titled “Custom Prompt”Add specific instructions for the AI:
- Click Edit Prompt to open the custom instructions modal
- Add guidance like “Include a comparison table” or “Focus on small businesses”
- These instructions apply to drafts and specialist runs
Content Optimizer
Section titled “Content Optimizer”The Optimizer tab provides real-time content analysis and scoring.
Optimization Score
Section titled “Optimization Score”The circular gauge shows your overall optimization score (0-100). Unlike simple keyword-count tools, Floyi’s score reflects multiple dimensions of content quality:
- How well you cover the terms and entities that matter most to your topic, prioritizing the most relevant ones
- Whether you use those terms naturally, rather than repeating them for the sake of it
- Content structure and heading hierarchy
- How easy your content is for AI to parse and cite
- Reading level appropriateness for your audience
The score reflects your actual writing, so it climbs as you add real content — an outline of headings alone stays low until you write the body. Your score and competitor scores use the same model, so the comparison in the coverage heatmap is always apples-to-apples.
Tip: Aim for a green score for well-optimized content.
Source Overview
Section titled “Source Overview”Shows the data sources used for optimization:
- Competitors (6) - Top-ranking SERP pages analyzed
- AI (3) - Google AI Overview, AI Mode, ChatGPT responses
Click to expand and see individual sources with word counts.
Buttons:
- View Sources - See full content from each source
- Coverage - Open the term coverage heatmap
Terms Tab
Section titled “Terms Tab”Lists all recommended terms and entities extracted from competitors and AI sources, organized in two groups:
- Terms — topical phrases, concepts, and keywords found across competitor and AI content
- Entities — named entities like companies, tools, frameworks, and people
Each term shows:
| Column | Description |
|---|---|
| Count/Max | Your usage count vs. the competitor-derived target (e.g., “5/23”) |
| Term | The term or entity name |
| R | Relevance score (0-100) — how central this term is to your core topic |
| S / AI | How many SERP competitors and AI sources mention this term |
Use the Sort menu to choose how terms and entities are ordered:
- Relevance — highest relevance score first
- Source - Competitor — highest number of SERP competitor sources first
- Sources - AI — highest number of AI sources first
- A-Z — alphabetical order
Color-coded usage indicators:
- ⬜ Gray = Not yet used in your content
- 🟢 Green = Used and within the target range
- 🟡 Yellow = Slightly above the competitor target
- 🔴 Red = Significantly over the target — likely keyword stuffing
The target for each term is based on how often top-ranking competitors actually use it, so you’re always benchmarking against real content that ranks.
Actions:
- Click term → Jump to first occurrence in editor
- Highlight icon → Toggle term highlighting in editor
- Hide icon → Remove term from list (can restore later)
- Highlight All → Highlight all terms at once
GSC Queries Tab
Section titled “GSC Queries Tab”For pages that already have a matched URL with Search Console data, the Optimizer pulls every GSC query driving traffic to your URL and lists them with the same coverage UI as the Terms list. This lets you optimize toward the queries Google already associates with your page, not just competitor-derived terms.
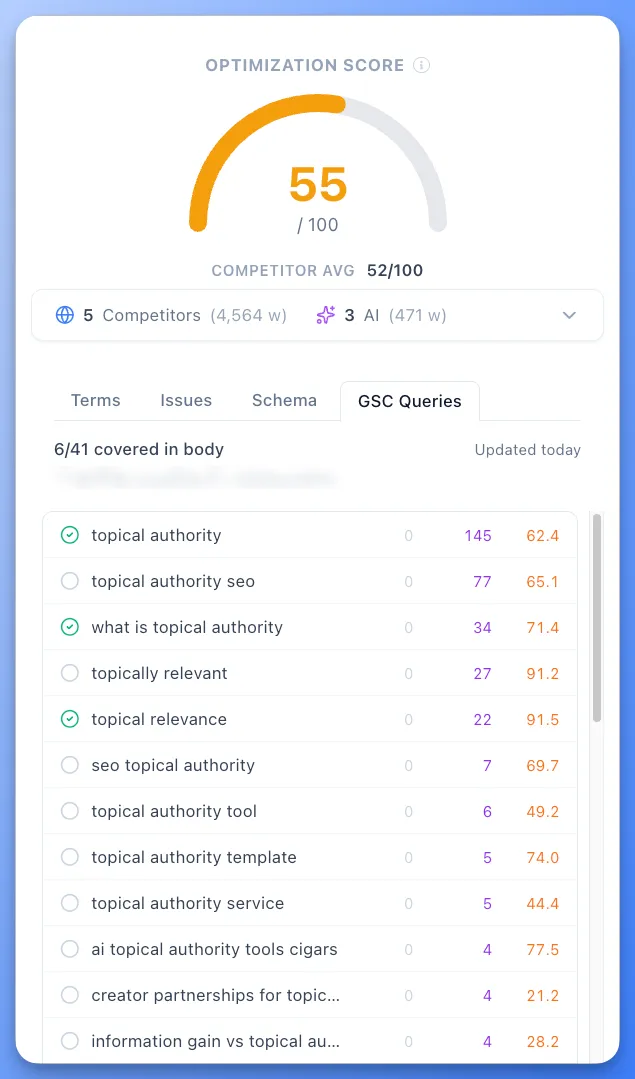
Each query shows:
| Column | Description |
|---|---|
| Coverage | Green check when your draft already mentions the query, gray when missing |
| Query | The exact Search Console query |
| Clicks | Clicks the query has driven to this URL |
| Impressions | Impressions the query has earned |
| Position | Your average ranking position for the query |
When the tab appears:
- Your topic must have a matched URL (manual match or planned URL slug)
- The matched URL must have GSC query data imported
If those conditions aren’t met, the tab guides you to match a URL or import GSC data first.
Actions:
- Click query → Jump to first occurrence in editor
- Highlight icon → Toggle query highlighting in editor
- Highlight All / Clear → Highlight or clear all GSC queries in the editor at once, just like the Terms list
- Copy icon → Copy any query to your clipboard with one click
Tooltips:
Hover over column headers (Clicks, Impressions, Position) to see what each metric means and how it is calculated from your Search Console data.
Why this matters:
- Refresh and rank recovery — see which ranking queries you’ve drifted away from and patch them in the same editor
- Optimize toward real demand — every edit moves you toward queries that already send traffic
- No spreadsheet juggling — your GSC data lives next to the draft, not in a separate tool
Issues Tab
Section titled “Issues Tab”Shows content structure issues:
Heading Structure
Section titled “Heading Structure”- Validates H2/H3/H4 hierarchy
- Flags skipped heading levels
- Recommends adding more sections if needed
AI Chunkability
Section titled “AI Chunkability”- Identifies paragraphs that run too long to be easily scanned or cited
- Click any flagged paragraph to navigate to it
- Long paragraphs are harder for AI to cite — break them into shorter chunks or lists
Reading Ease
Section titled “Reading Ease”- Shows Flesch-Kincaid grade level
- Recommends improvements for accessibility
- Target: 8th-10th grade for general audiences depending on the topic. Keep the reading level appropriate for the target audience.
Coverage Heatmap
Section titled “Coverage Heatmap”Click Coverage to open the full term coverage matrix:
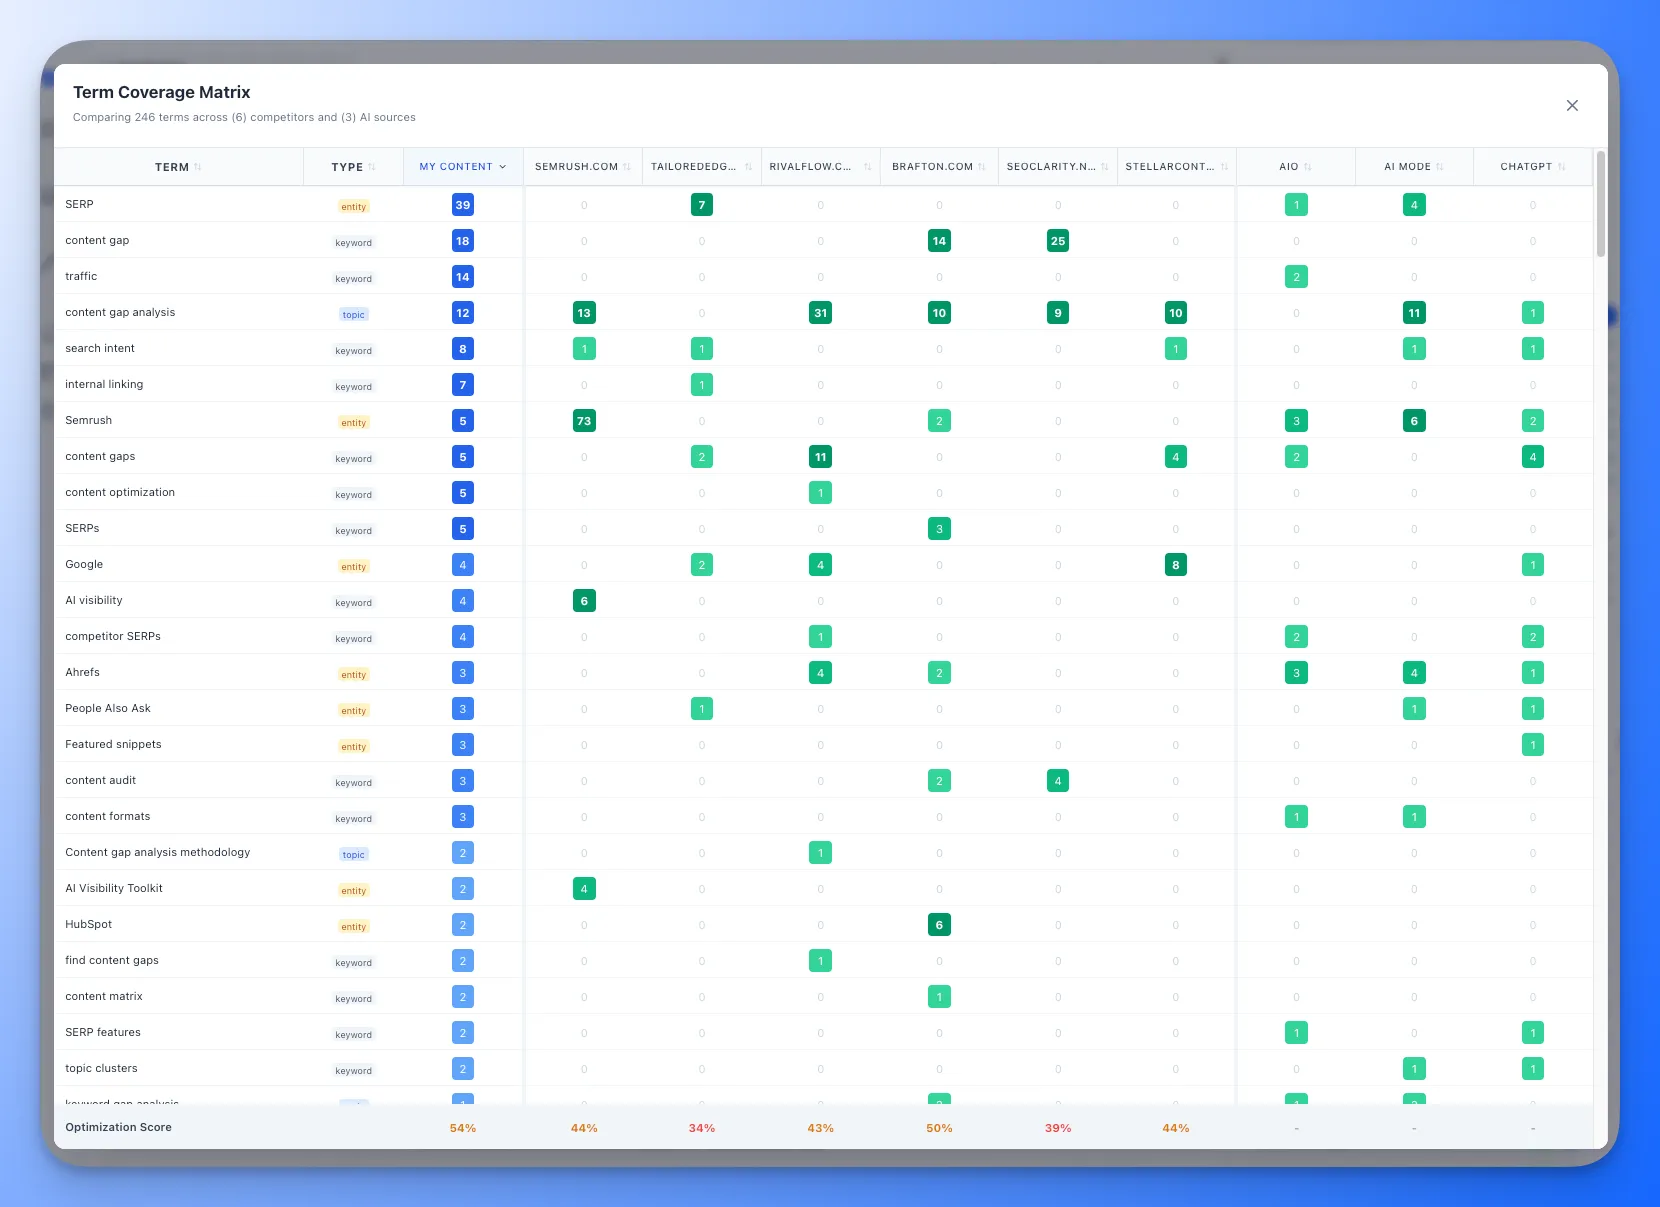
- Numbers show frequency of each term per source
- Green = present, Red = missing
- Compare your coverage to competitors at a glance
Source Content Viewer
Section titled “Source Content Viewer”Click View Sources to see full content from each source:
- Competitors: Full extracted text, summary, key claims, terms, entities
- AI Sources: Complete AI responses with extracted insights
- Expand/Collapse individual sources
- Expand All / Collapse All buttons at top
Schema Markup Tab
Section titled “Schema Markup Tab”The Schema tab generates JSON-LD structured data for your article and links its entities to the Knowledge Graph. Floyi auto-detects which schema types apply (Article, FAQ, HowTo, and more) and builds them from your content. Use the per-type toggle to include or exclude any schema type.
Entity Disambiguation
Section titled “Entity Disambiguation”Beyond the standard Article fields, Floyi connects the entities in your article to their canonical Knowledge Graph identifiers and groups them by role:
| Role | What it is |
|---|---|
| mainEntity | The single primary subject your article is about |
| about | Secondary subjects the article also covers |
| mentions | Supporting entities the article references |
Each entity includes its canonical name, description, image, a specific schema.org type (Person, Organization, Diet, and so on), sameAs links to Wikipedia and Wikidata, and identifier values for the Google Knowledge Graph MID and Wikidata QID. This is the same entity disambiguation that dedicated entity-SEO tools charge for — built in.
How it works:
- AI-assisted subject detection — Floyi reads your title, topic, and the entities in your draft to pick the primary subject, expanding abbreviations to the canonical entity (e.g., an “IBS Guide” resolves to Irritable bowel syndrome) even when the full name isn’t written out.
- Verified against your content — only entities that actually appear in your article body are included, so competitor-research terms that didn’t make it into your draft never leak into your schema.
- Regenerate — click Regenerate to re-run detection after major edits. The tab shows an “Article edited” hint when your draft has changed since the schema was last generated. Re-running the AI subject detection uses 1 credit.
Export:
Schema flows automatically into WordPress and GitHub publishing and HTML copy through the Include Schema option — no separate step.
AI Image Generation
Section titled “AI Image Generation”Generate AI images directly inside the editor and insert them into your article without leaving Floyi.
Getting Started
Section titled “Getting Started”Click the AI Images button in the toolbar (or switch to the Images tab in the right sidebar) to open the image generation panel.
Step 1: Analyze Your Draft
Section titled “Step 1: Analyze Your Draft”Click Analyze Draft to scan your article structure. Floyi identifies optimal image placements based on your H2 headings and content sections. Each suggested placement includes:
- Position — Which section the image belongs under (e.g., “After: Introduction”)
- AI-generated prompt — A detailed image description based on the section content
- Alt text — SEO-friendly alternative text for accessibility
You can edit any prompt before generating to fine-tune the image you want.
Step 2: Select and Configure
Section titled “Step 2: Select and Configure”- Select/Deselect individual placements using checkboxes, or use Select All / Deselect All
- Choose a model from the dropdown at the bottom of the panel:
| Model | Resolution | Best For | Credits |
|---|---|---|---|
| GPT Image 2 | 1K | Fast, affordable editorial images | 2/img |
| Nano Banana 2 | 1K | Wide aspect ratio support | 3/img |
- Choose an aspect ratio — Options vary by model. Default is 16:9 (landscape), which works best for article content. Nano Banana 2 supports a wide range of ratios (1:1, 4:3, 3:4, 16:9, 9:16, 3:2, 2:3, 21:9, and more); GPT Image 2 supports 1:1, 3:2, and 2:3.
Step 3: Generate
Section titled “Step 3: Generate”Click Generate N Images to start. The button shows the total credit cost. During generation:
- A progress bar shows completion status
- Images appear as thumbnails in a grid when ready
- Partial failures show per-image error messages with retry options
Step 4: Review and Insert
Section titled “Step 4: Review and Insert”After generation, you have two options:
- Click any thumbnail to open the full-size lightbox preview. Use arrow keys or click the arrows to navigate between images. Click Insert to place the image in your article below its target heading.
- Click “Insert All Remaining” to batch-insert all un-inserted images at once.
Inserted images show a green checkmark. If you delete an image from the article, the checkmark updates in real time so you can re-insert it.
Image Persistence
Section titled “Image Persistence”- Generated images are stored permanently on Floyi’s CDN (Cloudflare R2) and linked to your article
- Inserted images are saved as part of your article content (doc_json) and persist across page refreshes
- Previously generated images load automatically when you return to the Images tab — no need to regenerate
- Click “Generate more” to create additional images while keeping your existing ones
Visual Style from Brand Foundation
Section titled “Visual Style from Brand Foundation”If your Brand Foundation includes a visual style analysis, Floyi uses it to guide image generation — maintaining consistency with your brand’s aesthetic, color palette, and visual identity across all generated images.
- Use 16:9 or 3:2 aspect ratios for article images — they fit naturally in content flow
- Edit prompts before generating — the AI suggestions are a starting point, not final
- Start with GPT Image 2 for drafts (cheapest), switch to Nano Banana 2 when you need wider aspect ratios
- Featured Image inserts at the top of your article with its own H2 heading
Research Tab
Section titled “Research Tab”The Research tab surfaces the research inputs behind every article, so writers can see exactly what AI agents used during brief and draft generation.
Internal Link Suggestions
Section titled “Internal Link Suggestions”Internal link suggestions from your topical map, grouped into three relation types:
| Relation | Description |
|---|---|
| Parent | Links to parent topics in your topical map hierarchy |
| Sibling | Links to topics at the same level within the same parent |
| Subtopic | Links to child topics beneath the current article’s topic |
Each suggestion includes:
- Anchor text options — Multiple anchor text choices tagged by source (Map, AI, or custom)
- Click to select — Choose the anchor text you want, then place it in your article
- Real-time tracking — Links already placed in the editor show a green checkmark. Remove a link and the checkmark updates instantly.
Researcher Agent Queries
Section titled “Researcher Agent Queries”A list of the fan-out queries the Researcher Agent used during draft generation. These show the exact searches the AI performed to gather information for your article, giving full transparency into the research process.
Top SERP Competitors
Section titled “Top SERP Competitors”The top-ranking competitor URLs that were selected and analyzed during brief and draft creation. These are the same sources the AI used to inform content structure, entity coverage, and topic depth.
How to Use the Research Tab
Section titled “How to Use the Research Tab”- Open the Research tab in the right panel
- Review Internal Link Suggestions — click any suggestion to expand anchor text options
- Select an anchor text, then place the link in your article using the editor’s link tool
- Watch the green checkmarks update as you place links
- Review Researcher Agent Queries to understand what the AI searched for
- Check Top SERP Competitors to see which pages informed your brief and draft
Page Quality Scorecard
Section titled “Page Quality Scorecard”The Quality tab scores your draft using the quality signals Google’s patents describe. An AI judge reads your full draft and returns an overall score with per-dimension breakdowns, reasoning, and evidence quotes you can click to jump to the exact section in the editor.
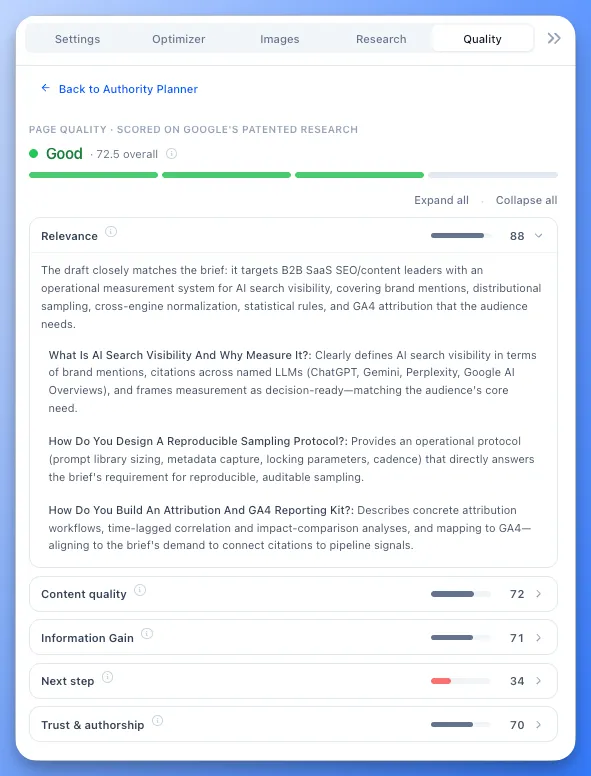
Overall Score
Section titled “Overall Score”The overall score (0-100) maps to the four-bucket scale Google’s patents describe:
| Bucket | Score Range |
|---|---|
| Excellent | 85-100 |
| Good | 65-84 |
| Average | 40-64 |
| Poor | 0-39 |
The overall number is a weighted blend of the five dimensions below. When a dimension can’t be scored for your article, the remaining weights rebalance, so a missing signal never counts against you.
The Five Quality Dimensions
Section titled “The Five Quality Dimensions”| Dimension | What It Measures |
|---|---|
| Relevance | How completely the page answers the target query and its intent |
| Content Quality | Depth, accuracy, structure, and the effort visible in the writing |
| Information Gain | Net-new information compared to what already ranks. Also known as originality |
| Next Step / Call to Action | Whether readers get a clear path forward. Content and editorial sites are judged on a soft next step, commercial sites on a real call to action |
| Trust & Authorship | Expertise signals, sourcing, and author presence |
Reading the Scorecard
Section titled “Reading the Scorecard”- Click any dimension to expand its reasoning and supporting evidence
- Click an evidence quote to jump to that section in the editor
- Use Expand all / Collapse all to open or close every dimension at once
- Hover the info icons to see the Google research behind each dimension
Information Gain Evidence
Section titled “Information Gain Evidence”If your article was generated from a brief, the brief research already identified net-new angles the current top results miss. The Information Gain dimension checks which of those angles actually made it into your draft and lists them as evidence, so you can see exactly what your page adds that competitors don’t.
Re-Analyze After Edits
Section titled “Re-Analyze After Edits”Click Re-analyze to score your draft again after making changes:
- Scores the latest saved version of your draft (auto-save keeps this current)
- Costs 10 credits per run
- Takes about a minute, and the tab updates automatically when the new scorecard is ready
- One analysis runs at a time per article
New drafts are scored automatically when generation finishes, so every article starts with a baseline scorecard at no extra cost.
Quality vs. Optimizer
Section titled “Quality vs. Optimizer”The two tabs answer different questions. The Optimizer measures coverage: terms, entities, and structure compared to competitors, updating as you type. The Quality tab is a judge: it reads the finished page the way Google’s quality systems do and tells you how it holds up as a whole. Use the Optimizer while writing, then run Quality before you ship.
Publishing to WordPress
Section titled “Publishing to WordPress”If you have a WordPress site connected in Settings > Integrations, you can publish your article directly from the editor.
Publish Button
Section titled “Publish Button”The WordPress publish button appears in the editor header. It shows your current WordPress status:
| Button State | Meaning |
|---|---|
| Globe icon (gray) | Not yet published to WordPress |
| Globe icon (green dot) | Published to at least one WordPress site |
| Globe icon (blue dot) | Saved as draft on WordPress |
Click the button to open the Publish to WordPress modal.
Publishing an Article
Section titled “Publishing an Article”- Select the WordPress site from the dropdown.
- Choose the post type (Post, Page, or custom type).
- Set the publish status (Draft, Publish Now, or Schedule).
- Assign categories and tags (for Post type).
- Choose an author from your WordPress site.
- Expand SEO Metadata to review or edit the SEO title, meta description, and focus keyword. These are auto-filled from your brief.
- Click Publish, Save as Draft, or Schedule.
Floyi converts your editor content to native Gutenberg blocks (or Classic HTML if your site uses the Classic Editor) and sends it with your configured metadata.
Updating Published Content
Section titled “Updating Published Content”After editing a published article, the publish modal shows a blue “Published on WordPress” banner with the current status and a link to view the live page. Click Update to push the latest version. The WordPress post ID and URL remain the same.
Publish from Multiple Sites
Section titled “Publish from Multiple Sites”If you have multiple connected WordPress sites, you can publish the same article to each one separately. Each site maintains its own publish record.
For full details, see the WordPress Publishing guide.
Saving & Exporting
Section titled “Saving & Exporting”Auto-Save
Section titled “Auto-Save”Content is automatically saved a moment after you stop typing. You’ll see:
- “Saving…” - Save in progress
- “Saved” - Content saved successfully
- “Save” button - Click to save immediately
Manual Save
Section titled “Manual Save”Click Save or press Cmd + S to save immediately. If a save is already running, your click queues another save right after it.
Copy to Clipboard
Section titled “Copy to Clipboard”Click Copy to copy your content:
- Copies as rich text (formatted)
- Paste directly into Google Docs, WordPress, etc.
- Preserves headings, lists, links, and formatting
Export Options
Section titled “Export Options”Click Export to download your content:
| Format | Description |
|---|---|
| HTML | Full HTML markup |
| Markdown | Standard markdown format |
| Plain Text | Text only, no formatting |
| Print-ready document |
View Brief
Section titled “View Brief”Click View Brief to open your content brief in a new tab:
- See complete brief recommendations
- Review structural suggestions
- Check keyword targets
Keyboard Shortcuts
Section titled “Keyboard Shortcuts”Formatting
Section titled “Formatting”| Action | Mac | Windows |
|---|---|---|
| Bold | Cmd + B | Ctrl + B |
| Italic | Cmd + I | Ctrl + I |
| Underline | Cmd + U | Ctrl + U |
| Strikethrough | Cmd + Shift + S | Ctrl + Shift + S |
| Inline Code | Cmd + E | Ctrl + E |
| Clear Formatting | Cmd + \ | Ctrl + \ |
| Link | Cmd + K | Ctrl + K |
Editing
Section titled “Editing”| Action | Mac | Windows |
|---|---|---|
| Undo | Cmd + Z | Ctrl + Z |
| Redo | Cmd + Shift + Z | Ctrl + Y |
| Save | Cmd + S | Ctrl + S |
| Find | Cmd + F | Ctrl + F |
| Select All | Cmd + A | Ctrl + A |
Navigation
Section titled “Navigation”| Action | Mac | Windows |
|---|---|---|
| Go to start | Cmd + Home | Ctrl + Home |
| Go to end | Cmd + End | Ctrl + End |
| Select paragraph | Cmd + Shift + Arrow | Ctrl + Shift + Arrow |
Tips & Best Practices
Section titled “Tips & Best Practices”Writing Workflow
Section titled “Writing Workflow”- Start with the brief - Open split screen and review recommendations
- Follow the structure - Use suggested H2s as your outline
- Cover high-priority terms - Work the recommended terms into your writing, starting with the highest-relevance ones near the top of the list
- Check issues - Fix heading and chunkability issues
- Run specialists - Enhance with SEO, data, or conversion focus
- Final review - Aim for a green optimization score
- Check Quality - Re-analyze in the Quality tab and aim for Good or Excellent before publishing
Optimization Tips
Section titled “Optimization Tips”- Watch the color indicators — green means you’re in range, yellow means ease off, red means you’re overusing a term
- Break up long paragraphs — AI struggles to cite walls of text
- Use clear headings — H2 → H3 → H4 hierarchy helps both readers and search engines
- Match competitor depth — check competitor word counts in Source Overview
- Focus on high-relevance terms first — the most relevant terms sit near the top of the list and have the biggest impact on your score
Strategic Intent Selection
Section titled “Strategic Intent Selection”| Choose This | When You Want |
|---|---|
| Human-First | Friendly, relatable content for brand building |
| LLM-Friendly | Maximum AI search visibility and citations |
| Executive Summary | Quick-read content for busy professionals |
Specialist Best Practices
Section titled “Specialist Best Practices”- Run one at a time first to see individual improvements
- Use custom prompts to guide specific enhancements
- Review changes - specialists suggest improvements, you control final output
- Combine strategically - SEO + Data Enricher for authoritative content
Need Help?
Section titled “Need Help?”- In-app tooltips - Hover over ℹ️ icons for quick explanations
- Documentation - Visit docs.floyi.com for detailed guides
- Support - Contact support@floyi.com for assistance