Content Editor & Optimizer
The complete guide to writing, editing, and optimizing content in Floyi.
Getting Started
Section titled “Getting Started”The Content Editor is Floyi’s all-in-one workspace for creating, editing, and optimizing content. You can access it by:
- From Topical Authority → Click “Create Draft” on any keyword
- From Content Briefs → Click “Generate Draft” after brief generation
- From Projects → Open any existing article draft
The workspace consists of three main areas:
- Left Panel (collapsed by default): View your content brief
- Center: The rich text editor
- Right Panel: Settings & Optimizer tabs
Content Editor Overview
Section titled “Content Editor Overview”Workspace Layout
Section titled “Workspace Layout”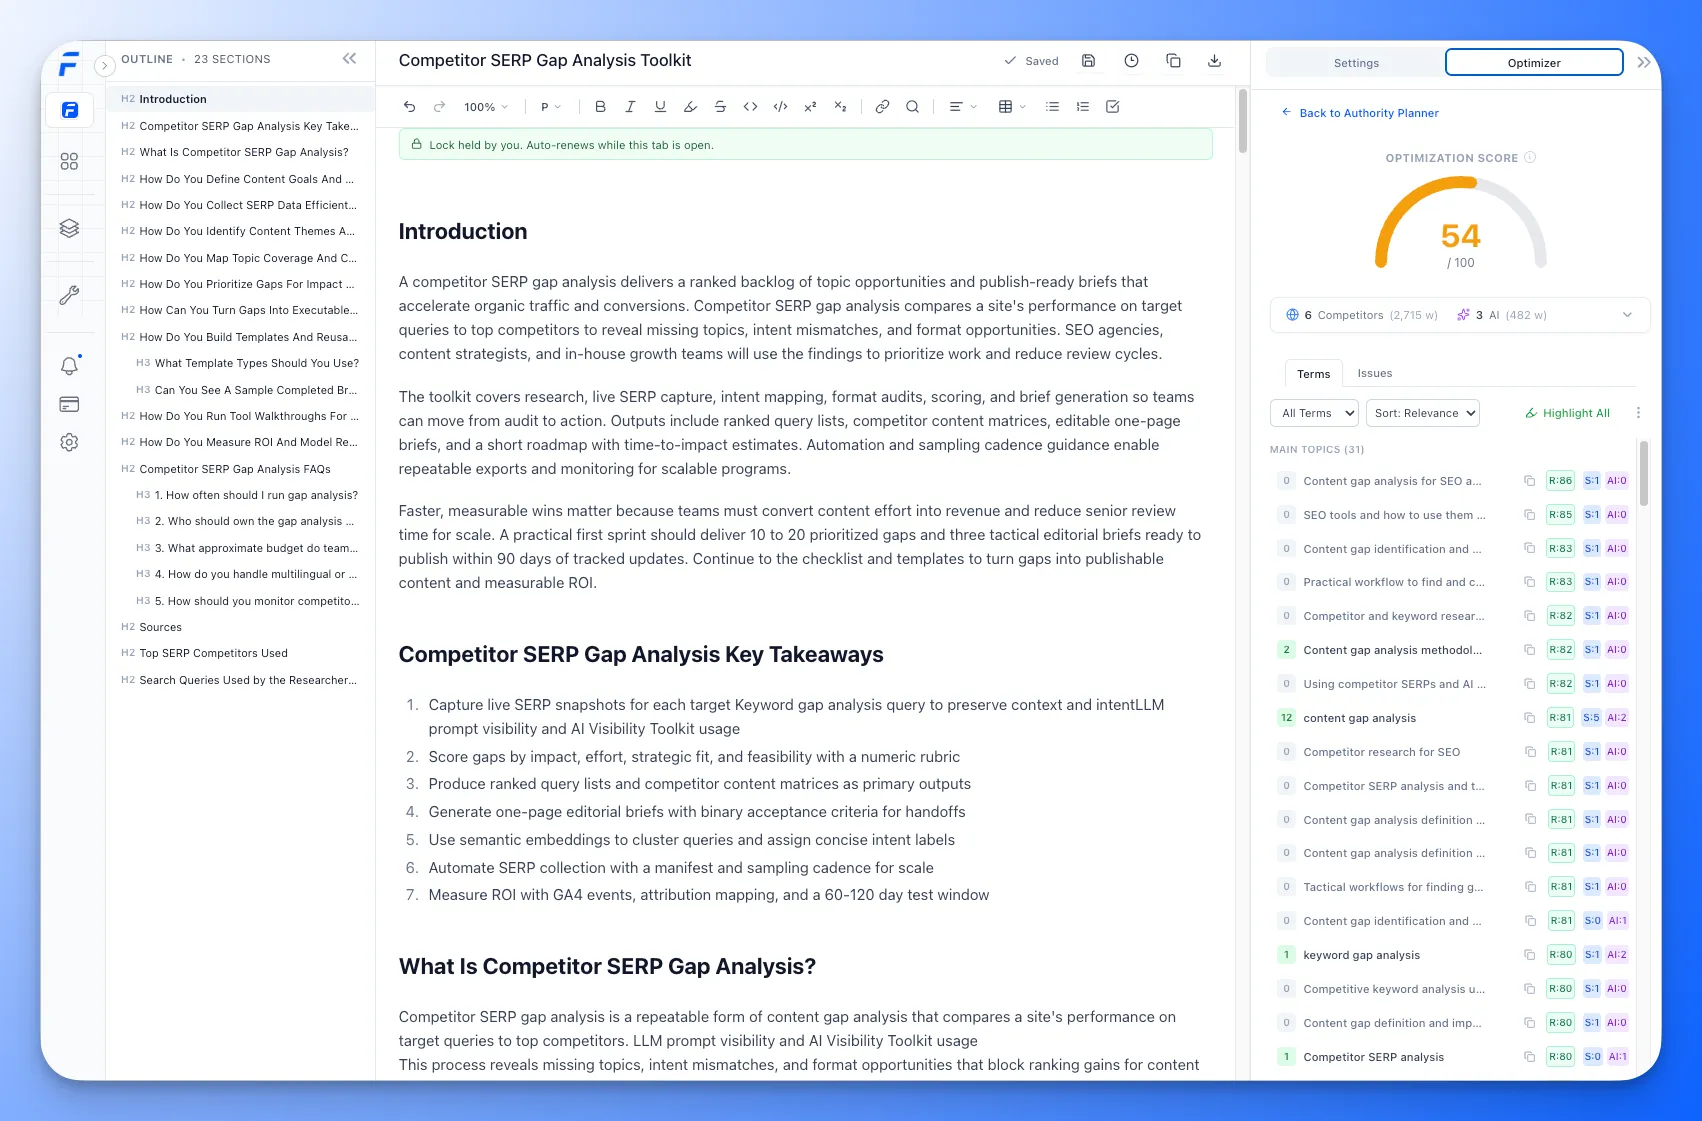
Split Screen Mode
Section titled “Split Screen Mode”Click Split Screen in the header to view your content brief alongside the editor. This helps you:
- Reference brief recommendations while writing
- Check structural suggestions
- Verify keyword coverage
- Stay aligned with strategic intent
Use the draggable divider to adjust panel widths.
Editor Toolbar
Section titled “Editor Toolbar”The toolbar provides all formatting options for your content.
Text Formatting
Section titled “Text Formatting”| Button | Function | Shortcut |
|---|---|---|
| B | Bold | Cmd + B |
| I | Italic | Cmd + I |
| Underline | Underline text | Cmd + U |
| Strikethrough | Cmd + Shift + S | |
Code | Inline code | Cmd + E |
| Clear | Remove formatting | Cmd + \ |
Block Formatting
Section titled “Block Formatting”| Button | Function |
|---|---|
| Paragraph dropdown | Convert to Paragraph, H2, H3, H4, etc. |
| Bullet List | Create unordered list |
| Numbered List | Create ordered list |
| Task List | Create checkboxes |
| Blockquote | Create quote block |
| Code Block | Create multi-line code |
| Horizontal Rule | Insert divider line |
Alignment
Section titled “Alignment”| Button | Function |
|---|---|
| Left | Align text left |
| Center | Center align |
| Right | Align text right |
| Justify | Justify text |
Links & Media
Section titled “Links & Media”| Button | Function |
|---|---|
| Link | Insert or edit link (opens modal) |
| Image | Insert image from URL |
| Video | Embed YouTube video |
| Table | Insert table |
Link Modal Options
Section titled “Link Modal Options”When inserting a link, you can configure:
- URL - The destination URL
- Link Text - Display text for the link
- Open in new tab - Whether to open externally
- Nofollow - Add rel=“nofollow” attribute
Tables
Section titled “Tables”After inserting a table:
- Click any cell to edit
- Use the table menu to add/remove rows and columns
- Drag to resize columns
- Merge cells for complex layouts
Find & Replace
Section titled “Find & Replace”Click the Search icon or press Cmd + F to open Find:
- Search for text in your content
- Navigate between matches with arrows
- Replace individual or all occurrences
Undo/Redo
Section titled “Undo/Redo”| Button | Function | Shortcut |
|---|---|---|
| Undo | Undo last action | Cmd + Z |
| Redo | Redo last action | Cmd + Shift + Z |
Use the Zoom dropdown (bottom right) to adjust editor zoom level:
- 75%, 90%, 100%, 110%, 125%, 150%
- Helps readability without affecting actual content
AI Writing Assistant
Section titled “AI Writing Assistant”The AI Writing Assistant is your in-editor AI copilot. Select any text and transform it instantly—simplify complex sentences, expand ideas, fix grammar, or give custom instructions.
For a deep dive into all features, see the AI Writing Assistant guide.
How to Use
Section titled “How to Use”- Select text in the editor (up to ~400 words)
- AI bubble appears above your selection
- Choose an action or type custom instructions
- Preview the result before accepting
Available Actions
Section titled “Available Actions”| Action | What It Does |
|---|---|
| Simplify | Makes text clearer and easier to understand |
| Expand | Adds detail, examples, or depth to your selection |
| Shorten | Condenses text while keeping key points |
| Fix Grammar | Corrects grammar, spelling, and punctuation |
| Optimize | Mode to incorporate specific terms from your brief |
| Custom | Your own instructions (e.g., “Make it more persuasive”) |
Preview & Accept
Section titled “Preview & Accept”After the AI generates a result:
- Original tab → See your original text
- Generated tab → Preview the AI’s version (with proper formatting for lists, tables, links)
Actions:
- ✓ Accept → Replaces your selection with the AI version
- ✗ Reject → Keeps your original text, closes the panel
Tips & Best Practices
Section titled “Tips & Best Practices”- Keep selections focused — 1-2 paragraphs work best
- Use Optimize Mode — Click Optimize, then select terms from the right panel to fill gaps
- Use Custom for tone — “Make it sound more confident” or “Use active voice”
- Links are preserved — Any links in your selection stay intact after transformation
- Works with formatting — Lists, bold, italic all render correctly in the preview
Content Settings Panel
Section titled “Content Settings Panel”The right panel has two tabs: Settings and Optimizer.
Settings Tab
Section titled “Settings Tab”Article Details
Section titled “Article Details”| Field | Description |
|---|---|
| Title | Your article’s title (auto-populated from brief) |
| Meta Description | SEO meta description for search results |
| Article URL | The target URL/slug for publishing |
| Estimated Word Count | Target word count based on competitor analysis |
Strategic Intent
Section titled “Strategic Intent”Choose how the AI writes your content:
| Intent | Writing Style | Best For |
|---|---|---|
| Human-First | Warm, conversational, friendly | Blog posts, thought leadership |
| LLM-Friendly | Clear, chunked, citation-ready | SEO content targeting AI search |
| Executive Summary | Concise, scannable, action-oriented | Business audiences, busy readers |
Note: You can only change Strategic Intent before generating your first draft.
Specialist Agents
Section titled “Specialist Agents”After generating an initial draft, you can run Specialist Agents to enhance specific aspects:
| Agent | Function |
|---|---|
| SEO Optimizer | Improves keyword placement and on-page SEO |
| Data Enricher | Adds statistics, studies, and data points |
| Fact Checker | Verifies claims and adds citations |
| Web Researcher | Finds and adds external references |
| Conversion Coach | Adds CTAs and conversion elements |
| Intro & Key Takeaways | Polishes introduction and summary sections |
How to use:
- Select one or more specialists
- (Optional) Add custom instructions
- Click “Run Specialists”
- Review the enhanced content
Custom Prompt
Section titled “Custom Prompt”Add specific instructions for the AI:
- Click Edit Prompt to open the custom instructions modal
- Add guidance like “Include a comparison table” or “Focus on small businesses”
- These instructions apply to drafts and specialist runs
Content Optimizer
Section titled “Content Optimizer”The Optimizer tab provides real-time content analysis and scoring.
Optimization Score
Section titled “Optimization Score”The circular gauge shows your overall optimization score (0-100) based on:
- Term coverage from competitors and AI sources
- Content structure and heading hierarchy
- AI readability and chunkability
- Reading level appropriateness
Tip: Aim for 70+ for well-optimized content.
Source Overview
Section titled “Source Overview”Shows the data sources used for optimization:
- Competitors (6) - Top-ranking SERP pages analyzed
- AI (3) - Google AI Overview, AI Mode, ChatGPT responses
Click to expand and see individual sources with word counts.
Buttons:
- View Sources - See full content from each source
- Coverage - Open the term coverage heatmap
Terms Tab
Section titled “Terms Tab”Lists all recommended terms with:
| Column | Description |
|---|---|
| Term | The topic, entity, or keyword |
| R | Relevance score (0-100) - higher = more important |
| Count | How many times it appears in your content |
| Type | Topic, Entity, Keyword, or Claim |
Color indicators:
- 🔴 Red = Missing (not used yet)
- 🟢 Green = Used (appears in content)
- 🟡 Yellow = Overused (too many occurrences)
Actions:
- Click term → Jump to first occurrence in editor
- Highlight icon → Toggle term highlighting in editor
- Hide icon → Remove term from list (can restore later)
- Highlight All → Highlight all terms at once
Issues Tab
Section titled “Issues Tab”Shows content structure issues:
Heading Structure
Section titled “Heading Structure”- Validates H2/H3/H4 hierarchy
- Flags skipped heading levels
- Recommends adding more sections if needed
AI Chunkability
Section titled “AI Chunkability”- Identifies paragraphs that are too long (>100 words)
- Click any flagged paragraph to navigate to it
- Long paragraphs are harder for AI to cite
Reading Ease
Section titled “Reading Ease”- Shows Flesch-Kincaid grade level
- Recommends improvements for accessibility
- Target: 8th-10th grade for general audiences depending on the topic. Keep the reading level appropriate for the target audience.
Coverage Heatmap
Section titled “Coverage Heatmap”Click Coverage to open the full term coverage matrix:
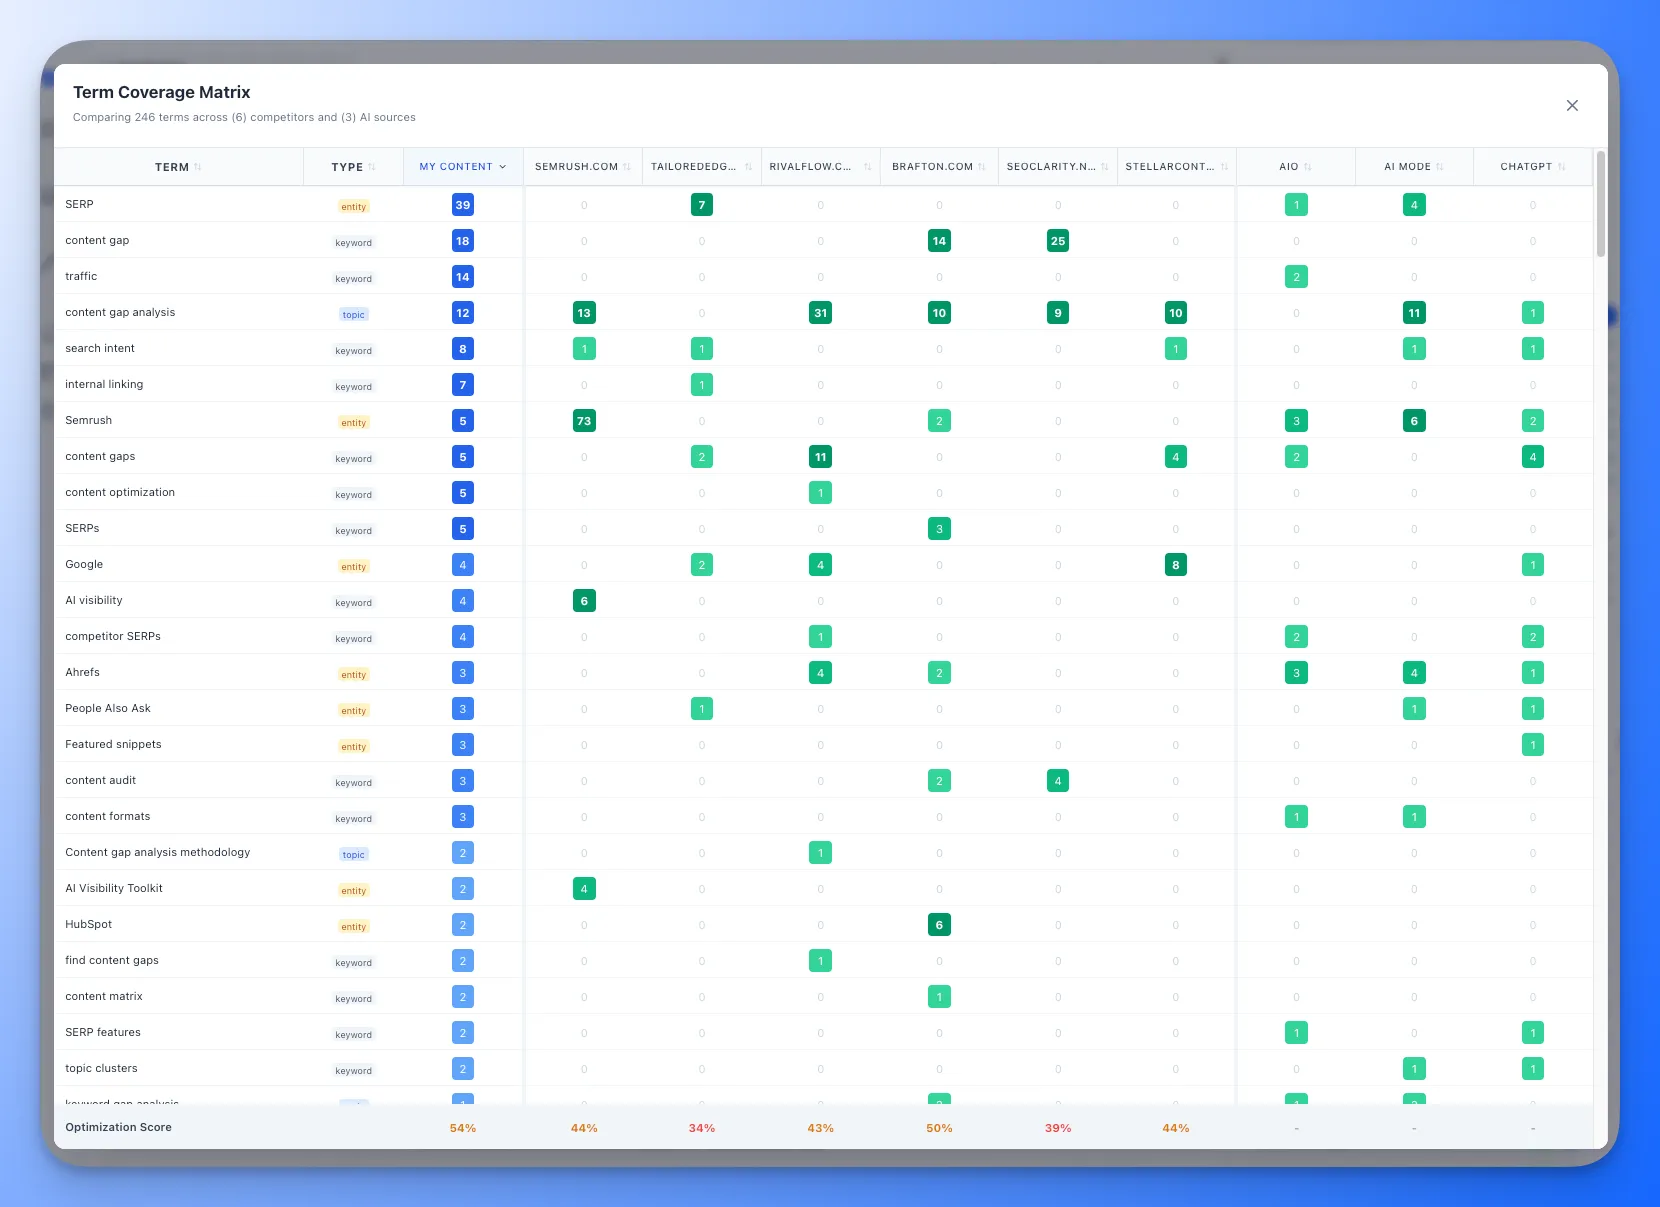
- Numbers show frequency of each term per source
- Green = present, Red = missing
- Compare your coverage to competitors at a glance
Source Content Viewer
Section titled “Source Content Viewer”Click View Sources to see full content from each source:
- Competitors: Full extracted text, summary, key claims, topics, entities
- AI Sources: Complete AI responses with extracted insights
- Expand/Collapse individual sources
- Expand All / Collapse All buttons at top
Publishing to WordPress
Section titled “Publishing to WordPress”If you have a WordPress site connected in Settings > Integrations, you can publish your article directly from the editor.
Publish Button
Section titled “Publish Button”The WordPress publish button appears in the editor header. It shows your current WordPress status:
| Button State | Meaning |
|---|---|
| Globe icon (gray) | Not yet published to WordPress |
| Globe icon (green dot) | Published to at least one WordPress site |
| Globe icon (blue dot) | Saved as draft on WordPress |
Click the button to open the Publish to WordPress modal.
Publishing an Article
Section titled “Publishing an Article”- Select the WordPress site from the dropdown.
- Choose the post type (Post, Page, or custom type).
- Set the publish status (Draft, Publish Now, or Schedule).
- Assign categories and tags (for Post type).
- Choose an author from your WordPress site.
- Expand SEO Metadata to review or edit the SEO title, meta description, and focus keyword. These are auto-filled from your brief.
- Click Publish, Save as Draft, or Schedule.
Floyi converts your editor content to native Gutenberg blocks (or Classic HTML if your site uses the Classic Editor) and sends it with your configured metadata.
Updating Published Content
Section titled “Updating Published Content”After editing a published article, the publish modal shows a blue “Published on WordPress” banner with the current status and a link to view the live page. Click Update to push the latest version. The WordPress post ID and URL remain the same.
Publish from Multiple Sites
Section titled “Publish from Multiple Sites”If you have multiple connected WordPress sites, you can publish the same article to each one separately. Each site maintains its own publish record.
For full details, see the WordPress Publishing guide.
Saving & Exporting
Section titled “Saving & Exporting”Auto-Save
Section titled “Auto-Save”Content is automatically saved as you type (debounced 5 seconds). You’ll see:
- “Saving…” - Save in progress
- “Saved” - Content saved successfully
- “Save” button - Click to manually save
Manual Save
Section titled “Manual Save”Click Save or press Cmd + S to save immediately.
Copy to Clipboard
Section titled “Copy to Clipboard”Click Copy to copy your content:
- Copies as rich text (formatted)
- Paste directly into Google Docs, WordPress, etc.
- Preserves headings, lists, links, and formatting
Export Options
Section titled “Export Options”Click Export to download your content:
| Format | Description |
|---|---|
| HTML | Full HTML markup |
| Markdown | Standard markdown format |
| Plain Text | Text only, no formatting |
| Print-ready document |
View Brief
Section titled “View Brief”Click View Brief to open your content brief in a new tab:
- See complete brief recommendations
- Review structural suggestions
- Check keyword targets
Keyboard Shortcuts
Section titled “Keyboard Shortcuts”Formatting
Section titled “Formatting”| Action | Mac | Windows |
|---|---|---|
| Bold | Cmd + B | Ctrl + B |
| Italic | Cmd + I | Ctrl + I |
| Underline | Cmd + U | Ctrl + U |
| Strikethrough | Cmd + Shift + S | Ctrl + Shift + S |
| Inline Code | Cmd + E | Ctrl + E |
| Clear Formatting | Cmd + \ | Ctrl + \ |
| Link | Cmd + K | Ctrl + K |
Editing
Section titled “Editing”| Action | Mac | Windows |
|---|---|---|
| Undo | Cmd + Z | Ctrl + Z |
| Redo | Cmd + Shift + Z | Ctrl + Y |
| Save | Cmd + S | Ctrl + S |
| Find | Cmd + F | Ctrl + F |
| Select All | Cmd + A | Ctrl + A |
Navigation
Section titled “Navigation”| Action | Mac | Windows |
|---|---|---|
| Go to start | Cmd + Home | Ctrl + Home |
| Go to end | Cmd + End | Ctrl + End |
| Select paragraph | Cmd + Shift + Arrow | Ctrl + Shift + Arrow |
Tips & Best Practices
Section titled “Tips & Best Practices”Writing Workflow
Section titled “Writing Workflow”- Start with the brief - Open split screen and review recommendations
- Follow the structure - Use suggested H2s as your outline
- Cover required terms - Check the Optimizer for high-relevance terms (R: 80+)
- Check issues - Fix heading and chunkability issues
- Run specialists - Enhance with SEO, data, or conversion focus
- Final review - Aim for 70+ optimization score
Optimization Tips
Section titled “Optimization Tips”- Don’t overstuff keywords - Yellow indicators mean you’ve used a term too much
- Break up long paragraphs - AI struggles to cite walls of text
- Use clear headings - H2 → H3 → H4 hierarchy helps both readers and search engines
- Match competitor depth - Check competitor word counts in Source Overview
Strategic Intent Selection
Section titled “Strategic Intent Selection”| Choose This | When You Want |
|---|---|
| Human-First | Friendly, relatable content for brand building |
| LLM-Friendly | Maximum AI search visibility and citations |
| Executive Summary | Quick-read content for busy professionals |
Specialist Best Practices
Section titled “Specialist Best Practices”- Run one at a time first to see individual improvements
- Use custom prompts to guide specific enhancements
- Review changes - specialists suggest improvements, you control final output
- Combine strategically - SEO + Data Enricher for authoritative content
Need Help?
Section titled “Need Help?”- In-app tooltips - Hover over ℹ️ icons for quick explanations
- Documentation - Visit docs.floyi.com for detailed guides
- Support - Contact support@floyi.com for assistance